If you have a half dozen or so various sized iris carts and hate looking at their utilitarian plasticness, this post might be for you! Sure those carts and towers of drawers are handy but they don't look very nice. Since my room is essentially open to the entire upper level of my house (and even seen by some of the lower level) I have been looking for "prettier" storage. which led to a need for a set of card catalog drawers or an apothecary of some sort. Only without the steep price tag.
I came across many great mail cubbies like this
...and realized they were essentially the same as a shoe organizer like this
ClosetMaid 25 cube cabinet
but I wasn't loving the idea of all the "mess" showing, and this made me think hmmm maybe I can make my own drawers! This drawer (below) reminded me of the old berry flats with the pine ends and cardboard sides/bottom. And right there an idea was born. :)
I started with two 25 space shoe organizers from Lowe's. these are not cheap so if you can find 1-2 used cabinet bases you could save a good chunk of money (Like $100!). two of them stacked without legs are about 5'4" tall. I had plans to add feet and a cown moulding piece to the top which would look GREAT, but I'm short LOL! Adding another 6-8" would mean the top drawers would not be as accessible so I went without feet/topper.
Here's what I ended up making and how:
I started with assembling the cabinets above and measuring the cubbies for my drawer size. then began creating the drawers. each drawer needed a 1/2" thick plywood front and back cut slightly smaller than the cubbie openings and just deep as the cabinet itself you want to take into account the thickness of the cardboard you use to create the sides and bottom of the drawers when calculating the width and height of the plywood pieces.
(* you'll see what I mean later)
I was lucky to have a Dad that would help me cutting all 100 fronts/backs using his table saw. ;) if you don't have a super handy Dad (or Husband! Mine got out of all the work because he was deployed and I couldn't wait any longer. :) ) Home Depot will rip plywood into board feet for you. (they just need to know the width you want.) then all you will need to do is cut to length with a chop saw. when we were done Dad drilled all the holes on the drawer fronts for the knobs, while I sanded the edges as needed. this only took us a couple hours believe it or not! I even used up some of the scrap plywood we had taking up space in the garage so I saved a bit of money there.
while we were at it I had him cut me a template out of some salvaged acrylic. I used this for cutting the cardboard to the perfect size. Just like a quilting template I cut around the outside of the template to get a plum cut which made perfect drawer "bellies".
using the template as a straight edge I creased the bottom corners of the drawer so they would wrap around the drawer fronts/backs forming the sides and bottoms of the drawers like a "U". I stapled in place with a heavy duty staple gun and
5/16" Light Duty Staples.
*a friend recently told me she and her DH used a table saw to cut down stacks of cardboard and the edges were "ok". might be an option if you want to try because I won't lie. cutting 50 sheets of cardboard took me a few nights to get through. I longed for the days of working in a picture framing gallery and having a wall mounted cutting system!
Before adding the sides you can decorate the drawer fronts by decoupaging scrapbook paper, wallpaper or old salvaged paper to them. I painted the fronts of mine white but later realized it might not have even made a difference. Your drawerwill look like this when you wrap the cardboard piece around the belly and sides of the drawer.
*the overall exterior size of the drawers is 11.5" deep (long) X 5 3/4" tall X 4 3/8" wide.
In my case I had a ton of used priority mail boxes from post CHA shopping this fall and a reorganization of my scraproom (I had kits stored in them). these boxes have very thin but strong construction and are the perfect material as they barely show when the drawers are closed. You can get two drawers worth of cardboard out of one box if you are careful to peel it apart at the side seams to open it up instead of cutting it open.
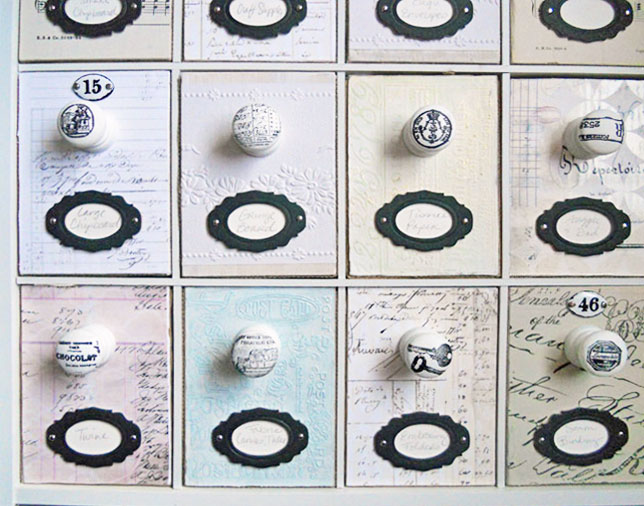
For the knobs I purchased plain wood knobs from an online bulk sales company and painted them white. once dry I stamped with black archival ink using various stamps I had on hand.
The label plate is a
Tim Holtz Die cut from heavy chipboard and black cardstock layered on top. I used watercolor paper for the label backing so pencil marks would erase easily if I wanted to put something new in a drawer. I attached them with my ATG. The brads on each end of the bookplate are purely decorative as is the enameled number plates on some of the drawers.
The drawers hold a lot of supplies. that lower right drawer has a full sized glue gun, two minis, a container of two bags of bulk large glue sticks and a few more colored sticks on top there. Since the cubbies are big enough to hold shoes you get twice as much room in here than a Library card catalog would allow. That's a HUGE bonus for me and was worth the effort to make this on my own over buying.
And then after I was all through making the cabinet, the idea came full circle when I found this on etsy (or ebay?). I realized someone else had used this same idea using tin formed around two pieces of lumber a long long time ago. LOL
One of these cabinets would look great with all sorts of salvaged knobs and pulls like this hardware drawer had on it.
Cost
2 ClosetMaid cabinets $45 each =$90
Scrap 1/2" plywood = free
(* it'about $15 for a sheet)
Wood knobs w/ screws $20
Priority Mail Cardboard boxes = free
5/16 light duty Staples= $5
----------------------
Total
$115
You can follow a discussion about the process and additional solutions for drawers at
Two Peas