I came across many great mail cubbies like this

...and realized they were essentially the same as a shoe organizer like this ClosetMaid 25 cube cabinet

but I wasn't loving the idea of all the "mess" showing, and this made me think hmmm maybe I can make my own drawers! This drawer (below) reminded me of the old berry flats with the pine ends and cardboard sides/bottom. And right there an idea was born. :)

I started with two 25 space shoe organizers from Lowe's. these are not cheap so if you can find 1-2 used cabinet bases you could save a good chunk of money (Like $100!). two of them stacked without legs are about 5'4" tall. I had plans to add feet and a cown moulding piece to the top which would look GREAT, but I'm short LOL! Adding another 6-8" would mean the top drawers would not be as accessible so I went without feet/topper.
Here's what I ended up making and how:

I started with assembling the cabinets above and measuring the cubbies for my drawer size. then began creating the drawers. each drawer needed a 1/2" thick plywood front and back cut slightly smaller than the cubbie openings and just deep as the cabinet itself you want to take into account the thickness of the cardboard you use to create the sides and bottom of the drawers when calculating the width and height of the plywood pieces. (* you'll see what I mean later)
I was lucky to have a Dad that would help me cutting all 100 fronts/backs using his table saw. ;) if you don't have a super handy Dad (or Husband! Mine got out of all the work because he was deployed and I couldn't wait any longer. :) ) Home Depot will rip plywood into board feet for you. (they just need to know the width you want.) then all you will need to do is cut to length with a chop saw. when we were done Dad drilled all the holes on the drawer fronts for the knobs, while I sanded the edges as needed. this only took us a couple hours believe it or not! I even used up some of the scrap plywood we had taking up space in the garage so I saved a bit of money there.
while we were at it I had him cut me a template out of some salvaged acrylic. I used this for cutting the cardboard to the perfect size. Just like a quilting template I cut around the outside of the template to get a plum cut which made perfect drawer "bellies".
using the template as a straight edge I creased the bottom corners of the drawer so they would wrap around the drawer fronts/backs forming the sides and bottoms of the drawers like a "U". I stapled in place with a heavy duty staple gun and 5/16" Light Duty Staples.
*a friend recently told me she and her DH used a table saw to cut down stacks of cardboard and the edges were "ok". might be an option if you want to try because I won't lie. cutting 50 sheets of cardboard took me a few nights to get through. I longed for the days of working in a picture framing gallery and having a wall mounted cutting system!
Before adding the sides you can decorate the drawer fronts by decoupaging scrapbook paper, wallpaper or old salvaged paper to them. I painted the fronts of mine white but later realized it might not have even made a difference. Your drawerwill look like this when you wrap the cardboard piece around the belly and sides of the drawer.

*the overall exterior size of the drawers is 11.5" deep (long) X 5 3/4" tall X 4 3/8" wide.
In my case I had a ton of used priority mail boxes from post CHA shopping this fall and a reorganization of my scraproom (I had kits stored in them). these boxes have very thin but strong construction and are the perfect material as they barely show when the drawers are closed. You can get two drawers worth of cardboard out of one box if you are careful to peel it apart at the side seams to open it up instead of cutting it open.
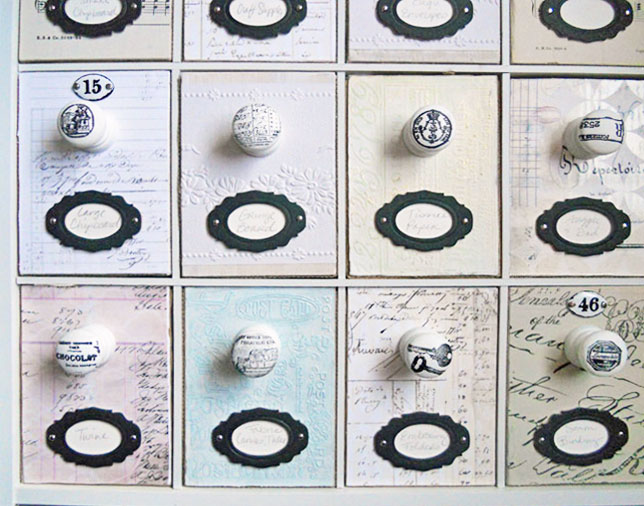
For the knobs I purchased plain wood knobs from an online bulk sales company and painted them white. once dry I stamped with black archival ink using various stamps I had on hand.
The label plate is a Tim Holtz Die cut from heavy chipboard and black cardstock layered on top. I used watercolor paper for the label backing so pencil marks would erase easily if I wanted to put something new in a drawer. I attached them with my ATG. The brads on each end of the bookplate are purely decorative as is the enameled number plates on some of the drawers.

The drawers hold a lot of supplies. that lower right drawer has a full sized glue gun, two minis, a container of two bags of bulk large glue sticks and a few more colored sticks on top there. Since the cubbies are big enough to hold shoes you get twice as much room in here than a Library card catalog would allow. That's a HUGE bonus for me and was worth the effort to make this on my own over buying.

And then after I was all through making the cabinet, the idea came full circle when I found this on etsy (or ebay?). I realized someone else had used this same idea using tin formed around two pieces of lumber a long long time ago. LOL
One of these cabinets would look great with all sorts of salvaged knobs and pulls like this hardware drawer had on it.


Cost
2 ClosetMaid cabinets $45 each =$90
Scrap 1/2" plywood = free
(* it'about $15 for a sheet)
Wood knobs w/ screws $20
Priority Mail Cardboard boxes = free
5/16 light duty Staples= $5
----------------------
Total
Totally awesome and amazing! Great job!
ReplyDeleteWoW! One of the best and most doable projects I've seen in a long time! Thank you for sharing! Your finished cabinet looks as pretty as anything you could buy!!! Great job!
ReplyDeleteWhat a great DIY storage solution! Love how you covered the fronts with various papers instead of just painting. Beautiful project!
ReplyDeleteThis is such an awesome idea.
ReplyDeleteIt turned out beautifully
very nice cabinet. I would probably use thin plywood for the drawers. I think that would hold up better thru time. I tend to stuff my drawers full. LOL
ReplyDeleteThanks for sharing. I love that they hold twice as much as the card catalogue.
Sylvia in MN
Sylvia, My dad said the same thing and I wanted to address it in the blog post but it was already epic! So here I go! lol
DeleteAs I explained to him, making these out of thin wood would have been way more time consuming to create 50 drawers. (Material, cutting, a jig to build, supplies for nailing and gluing, a place to do such a messy task, the additional time & $, plus a more complicated fix down the road should boxes not hold) It would not have been a DIY situation for many(including me) with completely wood drawers.
The old cardboard fruit flats held several pounds of fruit that was shipped hours or even states away. they held up well and are now made out of JUST cardboard. I recall the old ones even being re-purposed in our basement holding a dozen or more quart sized Mason jars that mom had used to can produce than came in those flats. They sat on the shelves year after year being pulled out over rough plywood shelves so mom could get jars out of them.
My drawers are packed full and I've been using this since October. the drawers have probably gotten their heaviest use while I was organizing my room. (I was pulling them open, removing them, and generally abusing them packing them with supplies! I have a LOT of supplies. all but 5 drawers on here is PACKED. and 2 were full of buttons until just the other day)
I have one drawer that probably has 4lbs of metal and wire items and the drawer is very study and is holding up well despite it being my most heavily used drawer for the month of December.
Should a couple drawers need fixing later down the road it will be simple to remove the cardboard, use that as my template, and recut & staple a new side/bottom. a task that should take less than 15 minutes. other than the odd drawer or mishap I don't foresee having to redo many (if any but I'm realistic that one or two might get crunched).
After my dad saw them completed he agreed they were sufficiently sturdy for my purpose. ie I'm not putting greasy nuts and bolts in there or sharp tools like chisels. (Dad is a wood worker who has been in the industry his entire working life and currently builds the stow away bins on the Boeing 767 :) He knows his stuff!)
I just love it. I may have to find a way to do something like this because it really holds alot and I could see making on section and putting on top of a shelf unit in place of my huge dresser thingie.
ReplyDeleteWow, this is super cool! Love this idea, thanks for sharing with us! I "pinned" it :)
ReplyDeleteYou rock! TFS. Absolutely stunning.
ReplyDeleteLove this! And I lve how the fronts are all slightly different whites.
ReplyDeleteWOW! Great job, Heidi...love the look of the finished drawers...very funky/shabby/fun!!
ReplyDeleteI love love love this! Great idea and thanks for all the instructions and photos. Apothecary cabinets are so expensive irl, so this is a great alternative!
ReplyDeleteThis is fantastic! Wow!
ReplyDeleteAbsolutely brilliant!!!
ReplyDeleteSuper great idea, love it.
ReplyDeletexxx
This is incredible - great job!!
ReplyDeleteLove it! Can you tell the products you used such as papers and stamps and some of the decorative details..Thanks for sharing! I cant wait to make one.
ReplyDeleteToo many stamps to list! many go back nearly 10 years probably from a couple dozen manufacturers. I know a good deal were limited edition or retired. 7 gyspies has a good deal of small stamps that would work (and I used!). any postage style or label stamps are great. I just rounded up all the 1" stamps I could find and then when I ran out of those I stamped portions of larger stamps.
DeleteThe only papers I could list are Pink Paislee's Mistables and few Bo Bunny Etc papers. the rest is vintage wallpapers, antique music books etc.
Awesome idea. I just love this! You did an amazing job and it is beautiful on top of it. You know how sometimes you visualize it in your head but it doesn't always turn out that great...well this is wonderful. Love it. Found you from Pinterest and I'm your newest follower. Yay!
ReplyDeleteBlessings,
Debbie
Just wandered over from two peas and suddenly find myself planning a diy project! Thanks for the inspiration!
ReplyDeleteBeautiful and useful project! It's great that you found a way to make it rather than just going out and buying one! I love that! Love Penny scrap-aholic@blogspot.com
ReplyDeleteThis is so lovely. You did a beautiful job on it and thanks so much for sharing it with us!
ReplyDeleteThis is GORGEOUS! I am sending my hubby this link!!!
ReplyDeleteThis is so cool! And wasn't it fun working with your dad? I always enjoy it when we do these types of projects together. Sort of an added bonus. TFS You did an awesome job!
ReplyDeleteExcellent project!
ReplyDeleteBeautiful job Heidi. I have always loved the look of those old Apothecary cabinets, but I actually love the look of your shabby chic one better, and it will actually hold more!! My first thought too was to make the drawers all wood, but as I looked over your pictures, my next thought was that I would get bogged down in all of the extra work that making 50 wooden boxes would entail, and thought that the cardboard wrap would work just as well, and hubbs can cut the cardboard with his many tools. Thanks for the inspiration, I really want to try this :)
ReplyDeletethis is AMAZING! New follower here! I found you through your Liebster Award on Sylvie's blog http://sylviehoobanoff.blogspot.com/
ReplyDeleteI love your apothecary chest! Can you share your sourceof the wooden knobs, and also what size they are? I am going to try to make one of these, yours is really inspiring!
ReplyDeleteCraftParts.com Bk1250
DeletePlease share pictures or a link to yours when you finish it ;)
Lovely job and how fun to work on a project with your dad! You make a great point, if the cardboard fails on one drawer, it will be a snap to replace.
ReplyDeleteSusanne.
Love. This. This is stunning!!! I may have to borrow your idea. Don't you know, never enough storage space. Now to figure out where to put it...
ReplyDelete:)
Ya know, I was just thinking. Something like this (maybe even just one of them) would be terrific in my daughter's bedroom. Looks like the perfect place for socks and undies to me. :) Gal, I think you're on to something here!!!
ReplyDeleteWow this is amazing!!!!!!
ReplyDeleteI just saw this via Pinterest and simply had to say BRAVO!!!! Not only is the idea brilliant, but your execution is spot on...and the finished product is lovely to look at and very usable! I am very tempted....very!
ReplyDeleteBeautiful color coordination ..love the whole shabby chic look
ReplyDeleteShoe cubbies! How brilliant!
ReplyDeleteSo so so cool. I am going to have to lift this idea. I really love how you decorated the drawers. This is my favorite storage solution yet. Thanks for sharing.
ReplyDeleteI love your cabinet!! I made my own from reclaimed desk drawers after I read your post. I linked to your page. I hope that's ok. Thanks!!
ReplyDeleteWhoa- that is AWESOME!!! I will be copying you for sure! This is exactly what I've been looking for - duh - great idea!!!
ReplyDeletevery cool! you are so creative!
ReplyDeleteFirst saw this over on Two Peas last year, and it's still a great idea. I might have to see if my brother can make the basic body for me, though I think I might like my drawers wider and shallower.
ReplyDeleteThanks for sharing!
Just violation of the usage agreement with the USPS for their "free" boxes. Those are intended for the use of mailing items Priority Mail. Something you agree to when taking the "free" supplies.
ReplyDeleteAs noted in the blog summary...These boxes were all USED and ready to be recycled. They had been the shipping boxes for countless craft supply kits and online orders. You can see in the draw close up photo that that particular one was even crushed in shipment, and the insides of the drawers are all labeled from shippers.
DeleteThis is such a creative and great storage piece! Love it! Thanks so much for sharing!
ReplyDeleteThanks Ashley! Sorry you missed it in the first time around! It's still holding up great. Hasn't needed a single repair yet.
DeleteOMG this is such and awesome project so much storage room and a space saver for small craft rooms. The end result looks like a high end cabinet you would get from a custom shop.
ReplyDeleteStill holding up STRONG! No signs of wear and tear 3 years later. Not even a staple has needed replacing.
ReplyDeleteI love the three tiered baskets!! Did you make this, and if so how? Or if you purchased, cabpn you please tell me from where, and how much? Thank you :-D You have a lovely craft room!
ReplyDeleteLaura