December 18, 2011

From the North Pole

Thought I would share some quick tags I did at 5am this morning. What else was I going to do at that time on a Sunday morning? LOL I tried checking for the paper but it had not even been delivered yet.
I put these together using the following dies:

Sizzix Originals Die Set - Large Tags, Scallop Combo #2

Sizzix Movers & Shapers Die - Carved Ornaments #2

Spellbinders Shapeabilities Dies, Ribbon Banners.

The "Happy Holidays" stamp was from the very old Making Memories magnetic stamps. ;) Yup I still use mine from time to time. they have wonderful tiny little images and words.

And my good old Krylon 18kt gold leafing pen! this is perfect for this die because it cuts out the toppers and the ornament from the same sheet. I just color it with gold or silver Krylon pen and I'm all set to glue it together.

The best part about these tags is that they can be used TWICE (or more!) the small tag can be written on this year and ripped off while you are cleaning up the piles of wrapping paper. That person who is always saving the bows from gifts will get an extra treat this year. ;) Whether that is you or your Holiday hostess! Just remove that small white tag and write on the back of the ornament next year.

December 11, 2011

Tim Tags Day 9


I'm skipping a day and will come back to this at the end. ;) Just wanted to mark my spot in order and let you know you I will be doing it later. Here is the tag Tim completed.

Tim Tags Day 10


Went a new direction here for a few reasons. First I really wanted to use this stamp I bought from Hero Arts called Musical Collage. I just love the background and the bird on it so much. it needed a tag! at that point I was still planning to stick to Tim's colors and techniques overall. except when I made my packing tape transfer of the Santa to go behind the fragment it came out very faded. not sure if I rubbed too much paper off (it was burnished on very well ahead of time so that wasn't it.) or if it could have just been the tape I was using. I've done these a dozen times before and gotten similar results though. To be honest my paper stack to begin with was not as *vibrant* as Tim's stack of papers were either. so maybe a printing issue? or a photoshop issue? I'm not sure. but you can see my Santa had more of a faded merury glass sort of feel to it.

Plan B...I fell in love with this tag I pinned on Pinterest the other day. beautiful palette of colors and embellishment choices. I have been itching to do more shabby chic style tags (I WILL get to them before xmas, hopefully lol) and just decided to go with it. faded Santa and all!


I inked the background using Distress inks Tumbled Glass, Spun Sugar and Shabby Shutters. Layered on the cut out dimmensional bird from the background using foam tape for dimension over the twig of mini Balsam fir (another miniatures craft Dept item), and covered everything with a bit of sparkle. (Sparkle shimmer spritz by Tsukineko, Krylon 18kt gold leafing pen, Diamond Stickles, Martha Stewart Pearl Paint, and clear German Glitter Glass applied with glossy accents.)

*Did you spot the old Heidi Swapp pink plastic letters on my banner? I love this font and hoard those little things. I have a couple other sheets of colors and fonts but that pink one is by far my favorite. aaaannnnd... I just realized I forgot to add glossy accents on top of the letters along with white paint on my banner. :P oops.


A side shot of my fragment. you can see the scalloped foil edge I applied using foil tape cut with scalloped scissors. I demonstrated this on Day 6 when I used it around the outside edge of my mercury glass inspired tag.


Just two more reveals to go!
December 9, 2011

Tim Tags Day 8


the tag today was great but I saw the watch cases at the bottom of the post and knew I needed to do a Polar Express themed tag.


I used the watch faces embossing folder and embossed the tag. then swiped versamark ink over just the raised surface and used white embossing enamel. heat set and then inked with Distress inks in faded denim, chipped sapphire covering the entire tag. then came back with black soot just around the edges which actually just darkens the sapphire to a deep navy. I was wanting to replicate the dark snowy backdrop from most of the movie. Inside the pocket watch case is a watchface set to midnight (when Santa leaves the North Pole) and a silver globe (earth) as well as a snowflake. There is even a tiny little brass tag with the word "express" stamped in it. (a vintage find I have had since 2001!) The vintage "admit one" tag is sprayed with gold shimmer to replicate the gold ticket for the Polar Express.


Tim Tags Day 7

a little behind here. I had to take a different direction on this one. Didn't have the product Tim listed so I went with a postcards and parcels theme.


*Die used is a spellbinders poinsettia. I inked with alcohol ink but wasn't happy with the dark color the red took on from the Kraft glassine. So I reheated it and painted it with luminArte Garnet while still warm (otherwise it beads off).


December 6, 2011

Tim Tags Day 6

Decided to go a different direction but may revisit Tim's technique again after seeing this tag on Pinterest. I was really skeptical of the paint technique going with my style. I decided to revisit the Day 10 tag from 2 years ago, using alcohol inks over the foil base. I loved this tag but it kind of sticks out from all the previous years. I had been wanting to do some more mercury glass looking tags for my collection and thought this was a perfect time.

Here's my tag from 2009


...and this year's tag


I'm going to show you how I created this look using one of my scraps of foil. Like I said yesterday this is a good way to test things. I had planned on using alcohol inks and then painting over it and doing a wipe away with pearl white paint. However, when I tried it the alcohol ink came off completely too. oops! and I was glad I took my own advice and tested that first on a scrap! I used the new Martha Stewart Craft paint but a friend said she has used cheap black craft paint and it's worked for her. definitely a time to test if you have the right craft paint for the job if you decided to go that direction.

Step one:
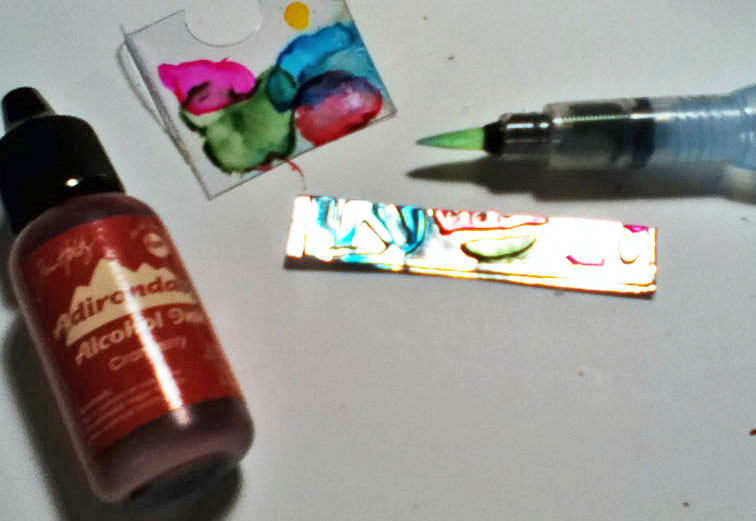
paint embossed foil using an H2O brush filled with alcohol ink blending solution. you can also use a small synthetic paint brush. just make sure to rinse it well in blending solution between each color. I put a drop of alcohol ink on a piece of transparency from yesterday and used that as my palette. lift the ink from there and apply to the foil.


Step two:
using a white Krylon paint pen (or white paint and a brush) apply white paint to the desired debossed areas.


Step three: if you use the krylon style of paint pen (this is oil based paint) the paint will stay wet for a few minutes giving you time to apply clear iridescent glitter in sections as you work. sprinkle and press into the paint with your finger. it will adhere immediately. if you use craft paint you may need to apply glossy accents and then glitter.


Step four: sand top surface of the tag (if you opted to use craft paint and glossy accents you may need to wait for it to dry before sanding)


Step five: ink a foam blending tool using walnut ink and add a bit of "dirt" to your tag. you can add some soot too if you want. I grabbed my Versa Magic Black Magic because it is an opaque black ink much like real soot. whereas the "black soot" colored Distress ink ironically, is translucent on foil. LOL


Step six: this is where I skipped adding embossing powder over the entire thing and opted for just sealing it with a *VERY* light coat of Krylon Preserve-it!. (TIP: this is a time when you may want to test on a scrap piece of foil again! the alcohol inks got tiny spray dots in it. i loved the look. almost like when you flick water onto Distress inks. you may have different results through so test it. if you want to skip the spray you can certainly do the embossing as Tim did).

*as a side note this little can of Krylon is a great size for the craft room. it's just enough for small jobs you can sit down in your trash can or a box, and spray. it IS stinky though!


Here is a close-up of the surface of my tag.


Step seven: To finish it off as shown above, I trimmed foil tape with scallop scissors to resemble the top of a vintage ornament. I then edged the tag in it (wrapping the excess around the back) to take away the sharpness of the foil edge.


I found a vintage buttercup light (I say that like I *don't* have boxes and bins of misc things stashed away for these tags LOL) and wrapped it with some craft wire making a little charm for my tag. The star is a vintage metal stud I attached to an old 7 gypsies clip which is very similar to Tim's clips. ;)


* yes I had a bit of a casualty tonight. the radiator ornament was in my possession less than 24 hours before I managed to break it by dropping my camera on it. I really wanted to kick myself as it was the inspiration for the tag to begin with. (I will be saving the pieces for a xmas inspired configurations box though. I have a couple good pieces from it that will look great in there.)

December 5, 2011

Tim Tags Day 5

I wasn't sure how this tag would turn out for me but I am really happy with the results and plan to do more. It will make you look at packaging in a whole new light for sure. I like the idea of not tossing all that clamshell packaging into the trash. there were some great ideas shared on the InLinkz gallery (scroll down to the bottom of Tim's daily post). My favorite technique being a windowpane effect. It would be gorgeous with different colored diamonds!

I didn't have the stamp Tim used for the background and chose a combination of the script stamp from the first reflections series and the snowflake stamp used yesterday. If you are in the same pickle I would suggest going through your stamps and testing them out ahead of time as I discuss below. you might even come up with a better combination!


When you cut out your clear tags use your scraps for a couple trial runs. While it is possible to wipe your tag clean using the blender solution, it's much easier to just use that extra alcohol ink on the felt to color a couple 1x2" pieces of scrap acetate. Try out your Archival black stamping and removal on these first. TIP: Tim mentions using a SOFT cloth. This is the time to skip the paper towels and reach for an old t-shirt! as he said blot first, just to remove the shininess of the ink. (it will still be blue/black at this point.) Next lightly buff away the remainder of the black ink. Your red alcohol ink might have a slight smear look to it but it won't show from the front side.


I ended up using a glitter stock for my backing tag instead of glossy cardstock. It gives the transparency added depth and let's the snowflakes twinkle a bit. Love that! A pearl or metallic cardstock might also be nice. I added a NOEL metal block embellishment. (old Making Memories product I had long forgotten! I bet you have some in your stash too.) Under the pearls I used some vintage iridescent sequins to mimic reflectors and irridescent buffalo flake glitter to add the look of snow.
I opted for luminarte to paint the surface of my wreath diecuts. it has a beautiful heavy luster.


I encourage you to give it a try even if this isnt your most favorite tag ( my dh deemed it his MOST favorite though :) ). The effect in person is quite beautiful and you may just find other ways to use it! How amazing would this be in black with cobwebs lifted away?!

Added: One more crazy cool tip I discovered on my own. if while hot gluing your bow in place you get the awful hot glue "threads" sticking to your transparency. you can use a small amount of blending solution on a soft cloth and they wipe right off. even the ones that you smeared in places! ;)

December 4, 2011

a sneak peek at Tag #5


What did I say yesterday??!! hmmmm? Red tag! :)

If you aren't already following, you must check out Mario's Twitter feed as he shares the BTS "behind the scenes" shots of Tim's upcoming tag.

Tim Tags Day 4


As lovely as this tag turned out I still had issues I had to work around for mine. Do you ever wish you had Tim looking over your shoulder? Giving you pointers when you utterly fail? LOL This was that time for me! I had so many issues . Namely stamping with distress stains! I tried both acrylic and rubber stamps, lightly sanded them as well. neither would create a usable image. What am I doing wrong??? I ended up using white paint for the flourish and the weathered wood ink pad for the flakes instead. I didn't have tumbled glass stain so I used broken china and added a bit of water. really not a good substitute as the colors were quite dark so keep that in mind.

also if you have problems with the "wonder tape" (aka red liner tape) sticking to the tag over the distress ink, try using score tape instead. that was the only option I could find that would actually stick.

Tip: Do NOT store a pin in your glossy accents tip like has been suggested. ;) I had a *good* stainless steel pin (labeled as such even) in mine. you can see where the glossy accents ate through the finish turning my new bottle of glossy accents into a sepia-rust toned color. :( It will work to glue things down but not for this task. had to use the matte accents instead. (I should have known. I had it happen with another glue but figured I'd give it a shot since it has been mentioned a few times.)

When Tim says apply a generous amount of crackle medium, that part is important. on the left side of my snowman's chest you can see a white spot. that is where I didn't get enough crackle medium. ;) really slop it on there thick! I work fairly fast and it was still mostly dry to use in time for the next step requiring that diecut(I just hit it at the end with a heat gun to dry any super thick blobs here and there)

I'm taking bets that they next tag will be bright red or at least very colorful. 3 of the 4 have been mostly blue. (and the reason I added a pretty Luminarte painted heart to his chest)


* yeah I just noticed that pearl sticking to the side of the button. LOL I have no idea how that got on there. Kindly ignore it please. :)
Related Posts Plugin for WordPress, Blogger...