December 5, 2011

Tim Tags Day 5

I wasn't sure how this tag would turn out for me but I am really happy with the results and plan to do more. It will make you look at packaging in a whole new light for sure. I like the idea of not tossing all that clamshell packaging into the trash. there were some great ideas shared on the InLinkz gallery (scroll down to the bottom of Tim's daily post). My favorite technique being a windowpane effect. It would be gorgeous with different colored diamonds!

I didn't have the stamp Tim used for the background and chose a combination of the script stamp from the first reflections series and the snowflake stamp used yesterday. If you are in the same pickle I would suggest going through your stamps and testing them out ahead of time as I discuss below. you might even come up with a better combination!


When you cut out your clear tags use your scraps for a couple trial runs. While it is possible to wipe your tag clean using the blender solution, it's much easier to just use that extra alcohol ink on the felt to color a couple 1x2" pieces of scrap acetate. Try out your Archival black stamping and removal on these first. TIP: Tim mentions using a SOFT cloth. This is the time to skip the paper towels and reach for an old t-shirt! as he said blot first, just to remove the shininess of the ink. (it will still be blue/black at this point.) Next lightly buff away the remainder of the black ink. Your red alcohol ink might have a slight smear look to it but it won't show from the front side.


I ended up using a glitter stock for my backing tag instead of glossy cardstock. It gives the transparency added depth and let's the snowflakes twinkle a bit. Love that! A pearl or metallic cardstock might also be nice. I added a NOEL metal block embellishment. (old Making Memories product I had long forgotten! I bet you have some in your stash too.) Under the pearls I used some vintage iridescent sequins to mimic reflectors and irridescent buffalo flake glitter to add the look of snow.
I opted for luminarte to paint the surface of my wreath diecuts. it has a beautiful heavy luster.


I encourage you to give it a try even if this isnt your most favorite tag ( my dh deemed it his MOST favorite though :) ). The effect in person is quite beautiful and you may just find other ways to use it! How amazing would this be in black with cobwebs lifted away?!

Added: One more crazy cool tip I discovered on my own. if while hot gluing your bow in place you get the awful hot glue "threads" sticking to your transparency. you can use a small amount of blending solution on a soft cloth and they wipe right off. even the ones that you smeared in places! ;)

December 4, 2011

a sneak peek at Tag #5


What did I say yesterday??!! hmmmm? Red tag! :)

If you aren't already following, you must check out Mario's Twitter feed as he shares the BTS "behind the scenes" shots of Tim's upcoming tag.

Tim Tags Day 4


As lovely as this tag turned out I still had issues I had to work around for mine. Do you ever wish you had Tim looking over your shoulder? Giving you pointers when you utterly fail? LOL This was that time for me! I had so many issues . Namely stamping with distress stains! I tried both acrylic and rubber stamps, lightly sanded them as well. neither would create a usable image. What am I doing wrong??? I ended up using white paint for the flourish and the weathered wood ink pad for the flakes instead. I didn't have tumbled glass stain so I used broken china and added a bit of water. really not a good substitute as the colors were quite dark so keep that in mind.

also if you have problems with the "wonder tape" (aka red liner tape) sticking to the tag over the distress ink, try using score tape instead. that was the only option I could find that would actually stick.

Tip: Do NOT store a pin in your glossy accents tip like has been suggested. ;) I had a *good* stainless steel pin (labeled as such even) in mine. you can see where the glossy accents ate through the finish turning my new bottle of glossy accents into a sepia-rust toned color. :( It will work to glue things down but not for this task. had to use the matte accents instead. (I should have known. I had it happen with another glue but figured I'd give it a shot since it has been mentioned a few times.)

When Tim says apply a generous amount of crackle medium, that part is important. on the left side of my snowman's chest you can see a white spot. that is where I didn't get enough crackle medium. ;) really slop it on there thick! I work fairly fast and it was still mostly dry to use in time for the next step requiring that diecut(I just hit it at the end with a heat gun to dry any super thick blobs here and there)

I'm taking bets that they next tag will be bright red or at least very colorful. 3 of the 4 have been mostly blue. (and the reason I added a pretty Luminarte painted heart to his chest)


* yeah I just noticed that pearl sticking to the side of the button. LOL I have no idea how that got on there. Kindly ignore it please. :)

December 3, 2011

Tim Tags Day 3

I made a lot of changes to Tim's design. Hope you enjoy them and can follow along. if you have any questions feel free to ask! sometimes I forget a change I've made.

I also got an iTouch for xmas (yes we celebrated early due to an upcoming deployment before the holidays) so I am trying out some step by step photos using it. the quality isn't as great but it should give you an idea what's going on. ;)

My Tag:


I started off with trying to find a good substitution. I had the same embossing folder but no stamp. I decided on embossing the upper part of the tag just as Tim did and then slicing open my music notes embossing folder (as Tim did on day 1 with the snowflake folder) and using that for the bottom of the tag. passing it through the sliced hole in the top of the music folder. (tip: if by chance your paper tears/cut when embossing it, just layer it onto another tag blank. it helps give tags with heavy embossing so strength anyway so I usually do this step even if I don't get any perforations from the folder.)


Once it was embossed I needed to color the raised images. I used the foam applicator and Ranger's wood handle to layer on the Distress ink. Try doing 2-3 light applications over the area and the color will build and deepen, looking more like the stamped images.


I have none of the Kraft-Core by Tim. So again, I used the Martha Stewart pearl paint (any paint would do though) and cut the images from Kraft cardstock. Painted the images and then sanded and inked as Tim suggested.


I layered the Festive Garland items onto the tag. Mine have had some UTEE added to the holly leaves. I also choose to paint the flourishes white. added two coats of UTEE and sprinkled gold German glass glitter into the still melted UTEE. (you can hit it again with the heat gun and let the glass glitter chunks sink into the enamel.

I added some gold trim and edged the tag with my favorite Krylon 18 Kt gold leafing pen. I've found so many uses for these paint pens. I am NEVER without them.

I used a collection of sequins and rhinestones from my stash for the berries. The alcohol ink trick does work though. my friends and I have been using it for everything from Dew Drops to flower stamens for a couple years. So give it a try if you like!

the small candy cane is another item I picked up at the craft store in the miniatures dept. some white craft wire and a red sharpie would yield similar results.


I wanted to give the letters a little more dimension and remembered a technique I started doing over the summer while trying to replicate gold foil embossed antique postcards. For this I use a Shakura Quickie Glue Pen and highlight the letters as shown in the example. Because this glue dries tacky you can take your time. once you have done a section dust with a soft gold embossing powder and shake excess off. melt enamel gently with your heat gun until it liquifies.


when finished it should look like this:

December 2, 2011

Tim Tags Day 2

So what did you all think of Tim's tag today? It went quick. I felt like it needed a little something "extra". I finished this early this morning but was waiting to add some extra touches to fit my style better. I ended up being happy with the final additions.

Mine:


I accidentally got a bit of red distress ink on his nose while turning my stark white canvas into something a bit more natural. Of course that meant he needed to be a Rudolph! (Tip: rub antique linen on craft mat and then spritz it with water. lay canvas image face down to adsorb color and dry with heat gun.)

If you are wondering where the mini garlands are coming from, check out the christmas miniatures dept in your local craft or hobby store. there is all sorts of great tag embellishments there.


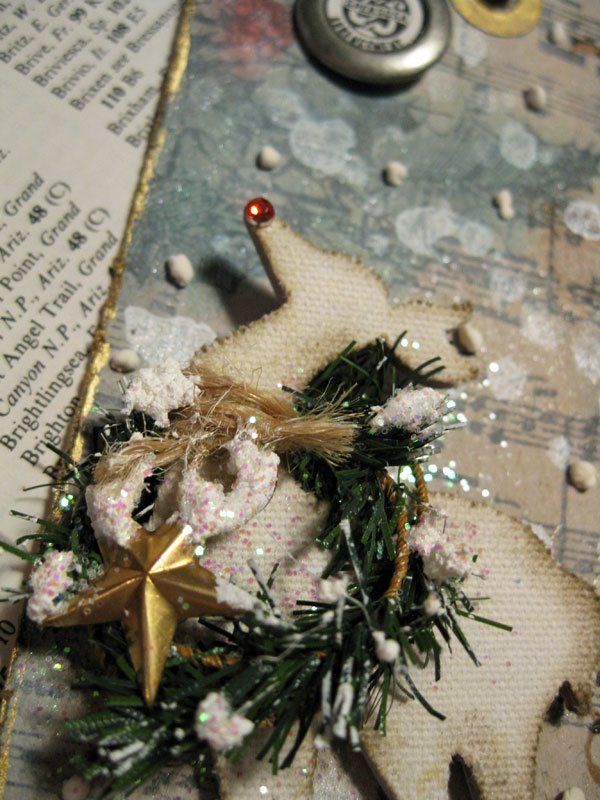
I made some additions to the snow on mine. the pearl mists just weren't enough sparkle & texture for me. I used Deco Art Snow-Tex and sprinkled with a little iridescent glitter. You can see it on the top of the tag, resting on top of the bottom border, and on the wreath and Star charm. This stuff works very good over distress inks. it is thick enough that I don't have *too* many issues with the ink/stain wicking up through the medium before it dries. I've had this bottle for probably 5-6 years. when it gets a little dry I just add water to it and the consistency is perfectly new again. I only dig this out about once a year too so not a lot to maintain it's consistency.

I also used Liquid Applique in white to make little flow "flakes" falling from the sky. Another item I have had for years and stays in good usable condition year to year. You want to use teenie tiny flea sized specks of this stuff though on your tag. I discovered you really don't need to let it air dry either. you can just hit it with a heat gun immediately and get these nice little balls of snowflakes.


Yesterday while I was cutting my banner out of old music paper I noticed a cool logo in the bottom corner and decided to save it for something. Do you do that too?? I have tons of little random bits of paper I can't part with. I think about tossing them all and starting over and then I find something like this.


I think the book must have been something like approved songs for barber shop quartets from the harp and barber pole icons. it fit the North Pole & Christmas Carol theme on this tag just perfectly if I do say so. I live for little details like this! :) (I think that charm is a very old Lil' Davis pebble charm if you are wondering)

Happy early Christmas to me!

I love Pier 1! I used to love shopping there in the 90's and then we fell out of love for a bit. A friend of mine is always showing me her cool finds there on holiday clearance. another friend spotted this online around the same time, so I stopped in again last spring and found this chair and just had to have it for our bedroom.


then they came out with the Rhodes chest and I fell in love all over again. Until I choked on the price, and left it at my Pier 1 store. ($400!!) yikes!! I WILL figure out a way to replicate this look though!!


a few days ago I got the holiday catalog & email to find they now had a Frenchy Mannequin dress form. They must have someone working at Pier 1 that stalks me. LOL I have been wanting one for a year so I could bring out my ribbon stash from hiding in a closet in another room!

Rob and I had seen some dressforms on our favorite shows like American Pickers so he knew right away that meant he was taking a drive to pick this up. Don't feel bad for him having to run to the mall on a weeknight, through traffic, after working. ;) He came home beaming because all the ladies at Pier 1 were fawning over him for being such a sweet husband to come buy that for his wife for Xmas. I do love him so much he got a big hug the minute he came through the door with "her". She is magnificent! much taller than I was expecting for the price tag. (if you are thinking of getting one, call first! my store is a heavily trafficked location and only had ONE in stock. they had to send another lady there drooling over mine, to a different store across town.)

here's what she looks like now!

December 1, 2011

Let the tags begin!


This is the 4th year I have participated in Tim Hotlz's 12 tags of Xmas. Sometimes I just enjoy creating something where someone else has worked out all the kinks and I just get to play with tools and new techniques. or at least I like to tell myself that...

This year started off with my Sizzix SideKick "eatting" my Festive Garland die. Nothing goes off without a hitch! Here I was all smug knowing my room had just had a major overhaul and reorganization. I wouldn't be wasting tooo much time working on my tags. Boy, was I wrong. 2 hours wasted getting that SideKick apart.

You might thing I salvaged the machine to save the die but you'd be wrong! the die was worth more. go figure! took me a while to break the case apart and free the die (while kicking myself cause I only have THREE Sizzix machines and of course Murphy's Law, I choose this one and the gear decided to strip.) only lost a cutting pad when I finally got it apart and realized that was the only way to remove the sandwich of dies/pads. ugh! there was NO budging it.

on to the tags!

check out tim's version of the day 1 tag

and here's a full shot of mine


I made a few changes to mine:
Kraft core cardstock was substituted for regular cardstock on the embellishments. T

The background tag I again used Kraft cardstock but covered the surface in a layer of Martha Stewart's new pearl paint in Aquamarine to minic the ability to sand through to the Kraft core like the Core'dinations Kraft Core cardstock.

I opted for a Swarovski snowflake with the bead charms at the top and used a vintage 1953 music paper for diecutting the banner. The pinecones got a bit of mica snow instead of white paint and stickles.

October 14, 2011

Now, where are my mice?!


I've had these paper mache pumpkin forms kicking around for a couple years. I had grand plans to turn one into a stage coach. (One of these days I WILL make one though!)


As you can see from the link to the paper mache forms, their stems are pretty boring. I decided to get out my paper clay and make some proper stems on them. I painted and stained the stems and gourds with several layers of mica powders and mists giving them a haunting glow in candlelight.


The leaves were cut using the Cricut Flower Shoppe cartridge. I used paper from two Echo Park collections; Victoria Gardens and Apothecary Emporium for the leaves, patches and tags.

October 13, 2011

Busy as a Bee!

I have been helping a friend out with some work and got a sweet gift in the mail this summer as a Thank You. I just love these Victorian style beehives. ;) She and her friend wrapped up everything so cute I knew I just had to save the tissue paper and ribbon for a layout.

This collection, Victoria Gardens by Echo Park was just perfect for it. The gray paper even had a bit of a beehive silhouette to it when I cut it out and tucked it under the ribbon.


And what good would a layout about a honey pot from a friend without a Winnie the Pooh reference. ;)


A day without a friend
is like a pot
without a single drop
of honey left inside.
- Winnie the Pooh
Related Posts Plugin for WordPress, Blogger...